
ARM Assembly Base64 Encoder: Part 2
Back in college, one of my assignments was to code a Base64 encoder in ARM assembly. After many hours of study, I got it. First, Let’s take a look at how ARM Assembly works.
Table of Contents
Let’s do ARM Stuff
Before we get started, go read @azeria’s ARM Tutorial. She is amazing at explaining everything and I will be taking alot of info from her. I will also be skipping alot of useful information, so it is essential that you go take a look.
Okay. Now to the hard part. First let’s go over some Assembly basics then the ARM File Structure. ARM is an assembled language. It is essentially CPU instructions that are “assembled” up to machine code. Then, a linker is used to link all the parts of the program together for execution. C, C++, Java, for example are compiled languages. They are written at a high level and are compiled down to executable code. Python, for example, is an interpreted language. This means that the interpreter translates the program line by line.
In other words, the difference between compiler and assembler is that a compiler is used to convert high-level programming language code down to machine language code. On the other hand, an assembler converts assembly level language code up to machine language code.
TL;DR: Assembler > Linker > Executable Code.
More commonly, one would write C code then use gcc to compile it down to an executable program:
gcc program.c -o program
But this is assembly! So to assemble code, we write our Assembly source code in a file ending with the extension .s, then we can use the GNU Assembler from GNU Binutils.
$> as base64.s -o base64.o
$> ld base64.o -o base64
Mnemonics
One step down from Assembly is the machine code. Basically, the binary values that a CPU reads to do anything.
1101 1100 0101 0000 0010 1010 1101 0000 0110
Do you know what that does? Of course not! Neither do I. Machine code is basically an electrical signal with an ON state (the 1’s) and an OFF state (the 0’s). We group these patterns of 0’s and 1’s into small groups. Since these small groups can repeat very often, we use mnemonics, or abbreviations to help us remember these patterns. In ARM, most mnemonics consist of three letters, such as LDR or MOV but you may see some with two letters BL. We can then write an assembly program with these instructions. These instructions also include operands after the mnemonics: ADD R3,R2,R1. The majority are read from right to left but that is not always the case! In this example: ADD R3,R2,R1, we add the value that is in Register 1 to the value that is in Register 2 and put it inside Register 3.
What is R1, R2, R3? Well, let’s talk about registers!
Registers
The number of registers depends on the version of ARM we are talking about. In the case of ARMSim#, that program uses the ARM7TDMI instruction set which has 16 Registers. Each register is 32 bits in size. For the General Purpose registers, think of those like a mini storage area that can hold any type of data. You can put whatever you want in those.
| Register | Purpose |
|---|---|
| R0 | General Purpose |
| R1 | General Purpose |
| R2 | General Purpose |
| R3 | General Purpose |
| R4 | General Purpose |
| R5 | General Purpose |
| R6 | General Purpose |
| R7 | General Purpose |
| R8 | General Purpose |
| R9 | General Purpose |
| R10 | General Purpose |
| R11 (fp) | Frame Pointer |
| R12 (ip) | Intra Procedural Call |
| R13 (sp) | Stack Pointer |
| R14 (lr) | Link register |
| R15 (pc) | Program Counter / Instruction Pointer |
| CPSR | Current Program Status Register |
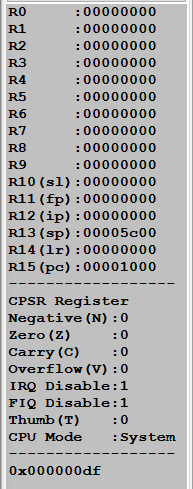 ARM Registers in ARMSim#
-
R0-R10 - Pretty much general purpose registers. However, R7 is used to store the syscall number when working with syscalls.
-
R11 (Frame Pointer)- Keeps track of boundaries on the stack. The stack is an area of memory used for temporary storage.
-
R12 (Intra Procedural Call) - This register has a dedicated role only during function call but at other times, it may be used as a scratch register.
-
R13 (Stack Pointer)- Points to the top of the stack.
-
R14 (Link Register) - When a function is called, the LR holds the memory address of the next instruction from where the function call was made from, so the program knows where to return to.
-
R15 (Program Counter / Instruction Pointer) - It stores the memory address of the next instruction to be executed.
-
CPSR - See that picture above where it says CPSR Register, followed by Negative (N), Zero (Z), Carry (C),etc.. ? Well those are called Flags. These flags are set according to the value of the CPSR. THis is used when you want to do conditional execution or branching.
- N – Set when the result of an operation was Negative.
- Z – Set when the result of an operation was Zero.
- C – Set when the operation resulted in a Carry.
- V – Set when the operation caused an overflow.
Instructions
There are many different types of ARM instructions. I am not going to go over all of them, but feel free to look them up in the ARM instruction reference. Here are a few:
- MOV - Moves data around.
- LDR - Loads data from a memory address.
- STR - Stores data from a register to a memory address.
- ADD - Adds stuff.
- SUB - Subtracts stuff.
- B - Branches or jumps to another section of code.
- CMP - Compares values. It updates the condition flags on the result, but does not place the result in any register.
- AND - Does a bitwise AND operation.
- ORR - Does a bitwise OR operation.
- MUL - Multiplies stuff.
- LSL - Does a logical shift left operation in the register. In other words, shifts the bits over to the direction that you specify in the register.
- LSR - Does a logical shift right operation in the register.
- ROR - Does a rotate to the right > Do a barrel roll!
and more…
Operands
As mentioned in the ARM Developer Guide: An instruction operand can be an ARM register, a constant, or another instruction-specific parameter. Instructions act on the operands and often store the result in a destination register. When there is a destination register in the instruction, it is usually specified before the other operands.
This is taken from Azeria’s page as she explains it really well:
MNEMONIC{S}{condition} {Rd}, Operand1, Operand2

MNEMONIC     - Short name (mnemonic) of the instruction
{S}          - An optional suffix. If S is specified, the condition flags are updated on the result of the operation
{condition}  - Condition that is needed to be met in order for the instruction to be executed
{Rd}         - Register (destination) for storing the result of the instruction
Operand1     - First operand. Either a register or an immediate value
Operand2     - Second (flexible) operand. Can be an immediate value (number) or a register with an optional shift
Let’s look at a few instructions, starting with: mov r1, r1
Reading this from right to left, this instruction basically moves the data from register 1 and puts it into register 1. In reality, this does nothing. Basically a no-op.
Now this one: add r2,r3,r4 This is an addition instruction and is read from right to left. It takes the data from register 4, adds it with the data in register 3, and puts the end result into register 2.
And this one: sub r2,r3,r4 This is a subtraction instruction and is read from right to left. It takes the data from register 4, subtracts it FROM the data in register 3, and puts the end result into register 2. If you add an S to the instruction SUBS, then the result will also update the CPSR register.
Good, now this one: ldr r2, [r0]. As mentioned above, LDR is used to load something from memory into a register. The brackets tell the assembler that the contents in register 0 hold a memory address. It then goes and retrieves the value at that address and puts it in register 2.
Now for the inverse: str r2, [r0]. In this instruction, we take the data in register 2 and store it in the memory address we have signified in register 0.
Finally: cmp r1, r2. In this instruction we are comparing the value in register 2 to the value in register 1. In theory, it subtracts the value of the operand on the right FROM the value of the operand on the left. This is the same as a SUBS instruction, except that the result is discarded.
Labels
A label in ARM assembly is simply a name given to the address of an instruction. A label can be any string that starts with a non-numeric value at the start of a line. In the example below, main is a label and can be used for branching. When called, the instruction will start at the first line underneath the label.
main:
    mov r1, r1 /* starts from here. */
    mov r2, r3 /* comments look like this in ARM */
Branching
Branching (think of it like jumping in x86) takes you to another section of code. It allows you to bypass a set or sequence of instructions and execute a different set of instructions. Branches can also take conditionals. For example, the ARM instruction B is standard for branch and can be modified like this: BLT or branch if less than. Take a look at this pseudocode:
int main() {
   int bigger = 0;
   int a = 2;
   int b = 1;
   b = b + a;
   b = b;
   if(a < b) {
      bigger = b;
   }
   else {
      bigger = a;
   }
   exit
}
Now the same code but in ARM:
main:
    mov r1, #2      <--- This sets the decimal value of 2 into register 1. (Think: int A = 2)
    mov r2, #1      <--- This sets the decimal value of 1 into register 2. (Think: int B = 1)
    add r2, r2, r1  <--- This adds the decimal value in r1 with the value of r2, and puts the result in r2 (should now hold 3). r1 does not change. (Think: B = B + A or 3 = 1 + 2)
    mov r2, r2      <--- This moves the data in r2 to r2. In other words, this does nothing. (think: B = B)
    cmp r1, r2      <--- Now we compare the values in r2 to that in r1. This will set a flag in the CPSR register.
    blt somewhere   <--- If the data in r1 (int A) is less than the data in r2 (int B), then jump to the label called somewhere.
                         /* In this case, A is less than B so it will jump over to somewhere. */
    mov r0, r1      <--- If it wasn't less than, then we would move the data from r1 (#2) into r0.
    b end           <--- Now we branch over to the label end.

somewhere:
    mov r0, r2      <--- Since we branched over to here, we would put the value of r2 in r0
    b end           <--- Now we branch over to the label end.

end:
    mov r7, #1      <--- This puts a value of 1 into r7. This is required for the system call 'exit'
    swi #0          <--- This performs the linux syscall
System Calls
 System Calls
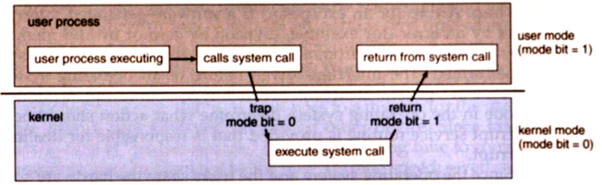
The system call provides an interface to the operating system services, like reading a file or printing to the terminal. Where can you find a list of all the system calls? On your raspberry pi itself! Located here: /usr/include/arm-linux-gnueabihf/asm/unistd-common.h
Now, coming to Raspberry Pi, which is a Broadcom SOC,BCM 2835,based on ARM Processor. Every System Call is having an Index in the System Call Table. The Index is an Integer value which is passed to the Register R7, in case of ARM Platform. The registers, R0, R1 and R2 are used to pass the arguments of the System Call. The instruction, SWI, which is now being used as SVC, which is a Supervisor Call, used to jump to the Privileged Mode, to invoke the Kernel. The number embedded with SVC #num, is used to refer to the Handler.
If you want to read more on system calls, check out this blog.
ARM File Structure
Take a look at this helloworld.s ARM program. This actually runs on a Raspberry Pi 3. So if you have one, feel free to copy the code and assemble/run it.
- armasm
1 |
|
Let’s recap that code starting with a few directives. At the top, we have a .data section. This is where you put stuff that you want to be automatically initialized by the system before it calls the entry point of your program.
-
Right below
.datawe have.align. This causes the assembler to pad the binary with bytes of zero value, in data sections, or NOP instructions in code, ensuring the next location will be on a word boundary..align ngives 2^n alignment on ARM cores. -
The next area is labeled
.text. This section is used to keep the actual code or instructions. We use a.global _startto tell the assembler where our program will be starting..globalTells the assembler that symbol is to be made globally visible to other source files and to the linker. -
.ascii "<string>"Inserts the string literal into the object file exactly as specified, without a NUL character to terminate. Multiple strings can be specified using commas as separators. -
.asciz "<string>"Like .ascii above but ends the string with a null byte. -
.setor.equin this case, sets the value of a symbol to an expresion. Think if it like an alias in linux.
You can find more info on ARM directives here.
Now let’s assemble the code and run it through the linker.
as -o hello.o hello.s
ld -o hello hello.o
Make a Makefile
How about making a Makefile so we don’t have to assemble and link everytime? Create a new file with the following:
- makefile
1 |
|
With the Makefile, all we do is type make in the terminal and it will assemble and link the program for us.
sage@pi:~ $ make
as -o helloworld.o helloworld.s
ld -o helloworld helloworld.o
Now lets run our program!
sage@pi:~ $ ./helloworld
Hello World
That’s it! We now have hello world successfully executing on our Raspberry Pi!
Continued in Part 3, coming soon…
Credits: